Thursday, January 22, 2009

Precedence Constraints

SSIS provides an updated version of the Precedence Constraints we had in DTS. They are the connectors between any two tasks in a flow. They decide the direction of the flow .

1.These Precedence Constraints can be configured in multiple ways.
2. A task can have multiple connectors indicating the multiple tasks that can be concurrently executed following its own completion.


3. If you wish to add a Precedence constraint, click on one task. It gives out an green arrow i.e. the precedence constraint. Drag the arrow to the next task you wish to connect to. You have now established the precedence between the two tasks. The second task will get executed on success of the first task.

4. The green arrow indicates "On Success". If you wish to add a task that should get executed on failure of a task, just right click on the green Precedence constraint and select Failure. The second task will now get executed on failure of the first task.

5. If you wish to add a task that should get executed on completion of first task, just right click on the green Precedence constraint and select Completion. The second task will now get executed on completion of the first task.

6. You can even add conditions to Precedence Constraint on which the next task will get executed.

7. Double click the Constraint, it shows you the Precedence constraint Editor.


8. You can configure multiple conditions on which your next task will get executed.

9. Evaluation operation allows you to select on which parameters you wish to configure the constraint.

If you select "Constraint", You need to select an value in the Value dropdown. Flow will move to next task based only on this value.

e.g. you select "Success" in Value dropdown, then only if the first task succeeds, the second task will get executed. If you select "Failure", then only if the first task fails, the second task will get executed.

If you select "Expression and Constraint", You need to select an value in the Value dropdown and specify a constraint in Constraint box. Flow will move to next task based on Value dropdown and successful evaluation on the Constraint.
e.g. in the image shown, the next task will get executed only if first task succeeds AND the variable "Count" is greater than zero.

10. The way a task can have multiple precedence constraints going out of it, it can even have multiple precedence constraints coming to it.

e.g. A certain task can be a joining point of two alternative path flows. So only one of its preceding task will get executed at any time and not both.


11. If however they are not alternative paths, the task may require both the previous path flows to finish before it starts execution.

12. This can be configured using the two radio buttons provided at the bottom of the Precedence Constraint Editor.

Logical AND : Indicates both the incoming tasks have to executed before this task can be executed.

Logical OR: Indicates completion of either of the incoming tasks is sufficient for the next task to executed.


e.g. In the above image, the Send Mail task will work if either of "Move File" Or "Delete File" task completes successfully.



Logging

SSIS allows you to create your custom Log files to store all the log data

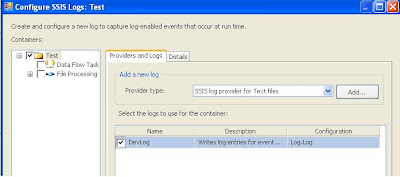
1. Go to File Menu options, SSIS >>Logging

2. Select Log Provider and Click on "Add" button.

3. Configure name, Description for Logging instance.

4. Create a new log file connection by Clicking on "New Connection". Give a path for file with ".log" extension.


5. In the Containers pane on left hand side, select the package to indicate the objects to be logged.

6. Now, Do not forget to check the checkbox in the logging instance you just added (one before "DevBox" text).


7. Select the "Details" tab seen at the top.

8.Select the events you wish to log against in the Events list. Generally "OnError","OnProgress","OnTaskFailed" and "OnWarning" should suffice the need.

9.Now Click on the Advanced button given below.

10.You see a matrix of values to be logged against the events to be logged. Select the appropriate values/events that suit your need.


11. Click on "Ok" and your logging is configured well.

12. You can configure the log file dynamically by setting the Log file's connection Manager Properties. You can set the Path value to some expression or Configurable varaible value.


13. If you wish to have a dateTime based log file, set the above variable "logFilePath" to build its value from an expression with current datetime included in filename part.


Error Handling

SSIS provides advanced features for Error Handling. We can define error handling events for entire package as well individual events to handle failure in any particular control.


1. To write event handler for a particulat container, select that container object and move to Error handlers tab at the top.
2. Click on the link at the centre stating " Click here to create an 'OnError' event handler for executable ..."
3. You can write your custom code here to handle the error.
4. On Error, the package variables "ErrorCode", "ErrorDescription" and "SourceName" are populated.
a] SourceName holds the name of the task that failed.
b] ErrorCode holds the errorcode of the error that occurred.
c] ErrorDescription holds the description of the Error that occurred.

You can store all messages in an object by appending all messages thrown and notifying user at the end with one single notification.

Dts.Variables["User::ErrorMessages"].Value = Dts.Variables["User::ErrorMessages"].Value + "\r\n" + Dts.Variables["System::ErrorDescription"].Value;


5. You can use these variables to notify the users of the error that occurred.

Sequence Container

A sequence container groups a set of activities together.

1] It holds together set of activities that need to be executed in sequence.

2] It helps in logical grouping of small parts of a package.

3] Unlike the For/ForEach the Sequence container is not a looping container and hence executes only once.


4] The Sequence container acts as a parent container for all its child controls.

For / ForEach Loop

In DTS, say if we had to work on a group of files or iterate through a list of objects, we had to write code for that in the script objects. It used to be very tedious and time consuming. SSIS however, provides us with two new controls, ForEach Loop and For Loop.


1] ForEach Loop

1. Drag and drop a ForEach Loop control from toolbox.

2. You can select appropriate choice in the Enumerator dropdown. Say if you wish to loop through a set of files at a folder location, you need to select "ForEach File Enumerator" option .

3. You can set a number of options on Collections tab. On click of The Expressions value box, a ellipsis appears. On click of the ellipsis, you can set a number of properties.

4. You can set the DirectoryPath variable to set the path to the folder you wish to scan Or set the "FileSpec" property for the file extensions or file suffix of the file you wish to look for in the form of a regular expressions. You can keep it general as "*.*" too.

5. On the Variable Mappings, select the name of the variable in which you wish to store the name of the object currently being processed through the loop. It can be used as reference for processing inside the loop. The datatype of the variable should match with the object datatype.


6. You can use other all the controls inside the ForEachLoop. It acts as a parent container for the nested controls.


2] For Loop

1. The For Loop works in runs through the loop multiple times in similar way like For Each Loop.

2. You can set the Assign Expression, Init Expression and Evaluation expression for the For Loop.

3. You can set a variable value at the start of the loop using "InitExpression".

4. The loop starts with this value and on completion of cycle executes the expression set in the "AssignExpression " expression.

5.It then evaluates the condition set in the "EvalExpression " expression. Until this condition is not true, it will continue to run the loop. When this condition evaluates to true, The loop stops and moves to next step if any.


6.You can use other all the controls inside the For Loop. It acts as a parent container for the nested controls.


Configuration Files

SSIS allows you to create configuration files to store and manipulat the configuration data.


1. Go to File Menu options, SSIS >>Package Configurations

2. Check the checbox "Enable Package Configurations"

3. Click on "Add" and then "Next"

4.Select "XML Configuration File" and browse for the path where you want to store the file. It default adds "dtsConfig" as an extension for Config file. Click Next.

5. You see a list of Variables, connection Managers, Package Properties, Event Handlers here. You can check the accompanying checkbox to select the varaibles etc that you wish to keep configurable. Only the checked values are added to config file.


6. Keep the Configurable items to minimum. When you select say a variable, select only the properties of the variable that you wish to configure e.g. Just select Properties "Value" and may be "Description" (You can add a descriiption as to what purpose the variable serves, or any specific instructions that you wish to provide abt the variable).

7.Click Next. Give a name to the Config settings , e.g if this config is meant for Development environment then "Dev-Config" would help you recognise the Config file.

Wednesday, January 21, 2009

Script Task

We need to use the Script task to do any custom coding. It uses the the MS Visual Basic .NET language.

1. Drag the Script task to the Control flow window.
2. Name the task appropriately and move to Script tab.
3. You need to specify any SSIS variables that you wish to use inside the Script task.
4. The variables can be distinguished between "ReadOnly" Variables and "ReadWrite" Variables. 5. Multiple variables can be specified using a comma separator.


6. You cannot specify the same variable as both "ReadOnly" and "ReadWrite". The Script task acquires the respective locks for these variables at the beginning of the task execution and releases the locks on completion of script task execution. If it fails to acquire lock on any of the variables (even after certain retries), or fails to find the variable in the list, then the task fails.


7. To write the script, click on "Design Script". MS Visual Studio opens up in a new window.
8. It shows you the function Main. It is the function that gets called on start of execution. You can write your code here. Just ensure your Main function ends with statement


Dts.TaskResult = Dts.Results.Success


9. A lock can even be acquired on a variable through the script inside the Script task. However, the varaible should not be present in either of the lists stated above. This results in lock conflict and the Task fails.


10. Lock can be achieved by following manner through the VB.net code:


Dim var As Variables
Dts.VariableDispenser.LockOneForWrite(VariableName, var)


'Now set the value here
var(0).Value = VariableValue


'Release the lock here
var.Unlock()


11. In case, you want to lock the variable for Read, in similar way just use the function :

Dts.VariableDispenser.LockOneForRead(VariableName, var)


Variables

You can declare variables for your processing in SSIS.


1. Right Click on the designer page and select "Variables".

2. It displays a left pane for variables.

3. Enter a appropriate name, Datatype, and default value if any for the Variable.

4. It default restricts the variable to the package domain.This is the parent container of all other containers. However, you can also declare a variable restricted to some child container (e.g Sequence container, for Loop etc). You just need to select the required container on the designer surface and then click on insert new variable. In that case, it takes up the container as the domain for that varaible. The variable will exist only in that container.

5. You can assign a default value to a Variable.

6. A variable can also be configured to recieve its value at run time.


Setting a variable value at Runtime:


1] A variable value can be set using a formula.

2] This can be done by setting the Expression property in Properties window of the variable.

3] Click the variable in the variable pane and see the Properties window
OR
Open the Package Explorer tab ( seen in line with Control Flow,Data Flow tabs) and select the required variable and right click, select Properties.

4] Set EvaluateVaraibleAs Expression property as True.

5]Click on Expression value box, and click on the Ellipsis that appears there.


6] Drag and drop variable needed from the Variables pane. You can use the various operators, String functions etc from the other pane to perform a variety of operations.
7] A variable value however is calculated freshly every time it is accessed. So its value may differ depending on the value of the variables involved at that time.

Some examples commonly needed:
1] To get datetime in a particular format you can use a expression string like :
DT_STR,4,1252)YEAR( getdate() ) + RIGHT( "0"+ (DT_STR,4,1252)MONTH( getdate()) ,2) + RIGHT( "0"+ (DT_STR,4,1252)DAY( getdate() ) ,2) + RIGHT( "0"+ (DT_STR,4,1252) DATEPART( "hh", getdate() ) ,2) + RIGHT( "0"+ (DT_STR,4,1252) DATEPART( "mi", getdate() ),2) + RIGHT( "0"+ (DT_STR,4,1252) DATEPART( "ss", getdate() ),2)
This string will give you a datetime string evaluating to 20090121175730 (yyyymmddhhmmss)

2] If you need a datetime string to get evaluated to same value always, replace the "getdate()" function here with the package Start Time(@[System::StartTime]). It is a Package variable and set automatically at the start of execution and doesnt get modified with time.
(DT_STR,4,1252)YEAR( getdate() ) + RIGHT( "0"+ (DT_STR,4,1252)MONTH( getdate()) ,2) + RIGHT( "0"+ (DT_STR,4,1252)DAY( getdate() ) ,2) + RIGHT( "0"+ (DT_STR,4,1252) DATEPART( "hh", getdate() ) ,2) + RIGHT( "0"+ (DT_STR,4,1252) DATEPART( "mi", getdate() ),2) + RIGHT( "0"+ (DT_STR,4,1252) DATEPART( "ss", getdate() ),2)

Monday, January 19, 2009

Execute SQL Task

The Execute SQL task is used to execute an SQL Statement from the SSIS package.


1] Drag and drop and "Execute SQL Task" object from tool bar.

2] Enter an appropriate name for the task. Select a connection Type and a connection object. If no connection has been created yet, you can create a connection here by clicking on "New Connection" in the Connection value box
3] Select a Result Type for your Task.
a] If you do not expect any result values back from DB, Select "None".

b] If you want a single value or multiple values, Select "Single Row".

c] If you expect rows of data or a dataset , Select "Full Resultset".


4] Select a SQL Source Type. It can be entered directly, or can be stored in a variable or can be stored in some file.


5] Enter a command by clicking on the ellipse that comes up on clicking in the SQL Command value box.


6] If your command has parameters, use "?" character in place where value is to be replaced into the command. If there are multiple parameters, use "," to separate the parameter values.

7] Enter an execution command and click on "OK".

8] If your command has parameters, move to Parameters tab.

9] Click on "Add" button to add a new Parameter. Replace the ParameterName column to indicate which variable takes which position in the command.Use 0,1,2..... to indicate the first,second,third variable and so on.
10] Select the variable that holds the Parameter value in the Variablename column. If no varaible has been created, you can use the "New Variable" option by clicking on the dropdown.

11] So the command here is equivalent to :
"Exec Sp_AddTwoValues @value1=Variable1, @value2 = Variable2"

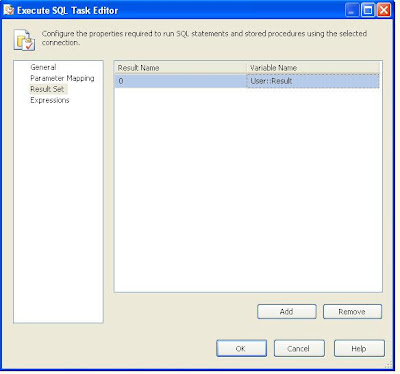
12] If you do expect any result values, move to Results tab.

a] If you want a single value or multiple values, click on Add and use the same logic as used on Parameter Screen.

b] If you expect rows of data or a dataset (i.e. with "Full Resultset" selected in "Results Type" option) Add a single variable here of datatype"Object".

13] However, if no values are fetched into the result variable, "Execute SQL task" throws error.This is one of the bugs in SSIS :)


Connection Managers

SSIS Provides with numerous connection managers e.g. File connection Manager, OLEDB connection manager. Here's an overview of how to use few of them.

1] OLEDB Connection Manager
A OLEDB connection manager can be used to typically connect to either of Databases.
Steps :
1] Right click in the Connection managers pane (pane at the bottom in your solution) and select OLEDB Connection Manager. You will see following window:


2] You can choose any one provider in the dropdown at the top.
3] Select the appropriate authentication type.
4] Enter UserName and Password. Check the Save Password checkbox.
5] If your login is successful, all the databases availabble on the server will be listed in the Database dropdown.Select Database you intend to use.You can even click on the button "Test Connection" to ensure the connection is working
6]Click "OK" and you are done with your Database connection.


Flat File connection Manager
It can be used to access flat files in the application.
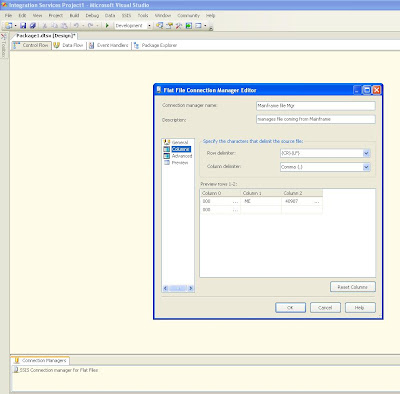
1] Right click in the Connection managers pane (pane at the bottom in your solution) and select Flat File Connection Manager.
2] Enter a name for Manager and select a flat file which is of the required format.
3] Click on tab "Columns" in Left pane of the window.
4] It parses the file into Columns based on default delimiters. You can modify the delimiter by choosing ones in the dropdown.


5] You can click on Advanced Tab to rename the columns or modify their datatype.

6] The Preview tab gives you an overview of the way your file is being parsed.

7] Click on "Ok" and you are done with your Flat File Connection Manager.