SSIS - SQL Server Integration Services
Its a begginners first Guide to SSIS or SQL Server Integration Services.
Friday, August 16, 2013
Populate variables with dynamic values
Exclusive Application Lock
DECLARE @ProcResult int = 0;
Tuesday, June 4, 2013
Friday, May 31, 2013
CurrentDateTime String expression
(DT_STR, 2, 1252) DAY( GETDATE() ) + (DT_STR, 2, 1252)MONTH( GETDATE() )+ (DT_STR, 4, 1252)YEAR( GETDATE() )+ (DT_STR, 4, 1252) DATEPART( "Hh", GETDATE() )+ (DT_STR, 4, 1252) DATEPART( "mi", GETDATE() )+ (DT_STR, 4, 1252) DATEPART( "ss", GETDATE() )+ (DT_STR, 4, 1252) DATEPART( "ms", GETDATE() )
Thursday, January 22, 2009
Precedence Constraints

3. If you wish to add a Precedence constraint, click on one task. It gives out an green arrow i.e. the precedence constraint. Drag the arrow to the next task you wish to connect to. You have now established the precedence between the two tasks. The second task will get executed on success of the first task.
4. The green arrow indicates "On Success". If you wish to add a task that should get executed on failure of a task, just right click on the green Precedence constraint and select Failure. The second task will now get executed on failure of the first task.
5. If you wish to add a task that should get executed on completion of first task, just right click on the green Precedence constraint and select Completion. The second task will now get executed on completion of the first task.
6. You can even add conditions to Precedence Constraint on which the next task will get executed.
7. Double click the Constraint, it shows you the Precedence constraint Editor.

8. You can configure multiple conditions on which your next task will get executed.
9. Evaluation operation allows you to select on which parameters you wish to configure the constraint.
If you select "Constraint", You need to select an value in the Value dropdown. Flow will move to next task based only on this value.
e.g. you select "Success" in Value dropdown, then only if the first task succeeds, the second task will get executed. If you select "Failure", then only if the first task fails, the second task will get executed.
If you select "Expression and Constraint", You need to select an value in the Value dropdown and specify a constraint in Constraint box. Flow will move to next task based on Value dropdown and successful evaluation on the Constraint.
e.g. in the image shown, the next task will get executed only if first task succeeds AND the variable "Count" is greater than zero.
10. The way a task can have multiple precedence constraints going out of it, it can even have multiple precedence constraints coming to it.
e.g. A certain task can be a joining point of two alternative path flows. So only one of its preceding task will get executed at any time and not both.
11. If however they are not alternative paths, the task may require both the previous path flows to finish before it starts execution.
12. This can be configured using the two radio buttons provided at the bottom of the Precedence Constraint Editor.
Logical AND : Indicates both the incoming tasks have to executed before this task can be executed.
Logical OR: Indicates completion of either of the incoming tasks is sufficient for the next task to executed.

e.g. In the above image, the Send Mail task will work if either of "Move File" Or "Delete File" task completes successfully.
Logging
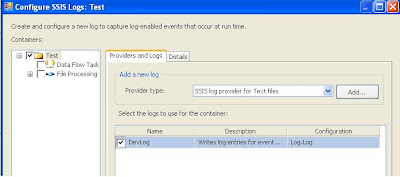
1. Go to File Menu options, SSIS >>Logging
2. Select Log Provider and Click on "Add" button.
3. Configure name, Description for Logging instance.
4. Create a new log file connection by Clicking on "New Connection". Give a path for file with ".log" extension.
5. In the Containers pane on left hand side, select the package to indicate the objects to be logged.
6. Now, Do not forget to check the checkbox in the logging instance you just added (one before "DevBox" text).
7. Select the "Details" tab seen at the top.
8.Select the events you wish to log against in the Events list. Generally "OnError","OnProgress","OnTaskFailed" and "OnWarning" should suffice the need.
9.Now Click on the Advanced button given below.
10.You see a matrix of values to be logged against the events to be logged. Select the appropriate values/events that suit your need.
11. Click on "Ok" and your logging is configured well.
12. You can configure the log file dynamically by setting the Log file's connection Manager Properties. You can set the Path value to some expression or Configurable varaible value.
13. If you wish to have a dateTime based log file, set the above variable "logFilePath" to build its value from an expression with current datetime included in filename part.
Error Handling
1. To write event handler for a particulat container, select that container object and move to Error handlers tab at the top.
 2. Click on the link at the centre stating " Click here to create an 'OnError' event handler for executable ..."
3. You can write your custom code here to handle the error.
 4. On Error, the package variables "ErrorCode", "ErrorDescription" and "SourceName" are populated.
a] SourceName holds the name of the task that failed.
b] ErrorCode holds the errorcode of the error that occurred.
c] ErrorDescription holds the description of the Error that occurred.
You can store all messages in an object by appending all messages thrown and notifying user at the end with one single notification.


